7 Payment System
Pico Pay is a game currency payment system based on the Pico account system and it’s settled according to the current game currency unit (P coin) under Pico. If your project needs an in-app-purchase feature, please read this chapter carefully; if not, please ignore this chapter.
7.1 Getting Ready
7.1.1 Getting Payment Strings
When developers integrate the payment SDK, they need to create an app on the developer platform and obtain corresponding strings. Here is the application process:
- Log in developer platform and register as a Pico member(http://dev.picovr.com/)
- Apply to be a developer
Developers include individual developers and enterprise developers, please apply according to your actual situation. When the submission is reviewed, we’ll give feedback within 3 working days. Please check the status on developer platform timely.
- Check Merchant ID
After becoming a developer, click on the nickname in the upper right corner to view developer ID, which will be the unique merchant identification in the payment system:
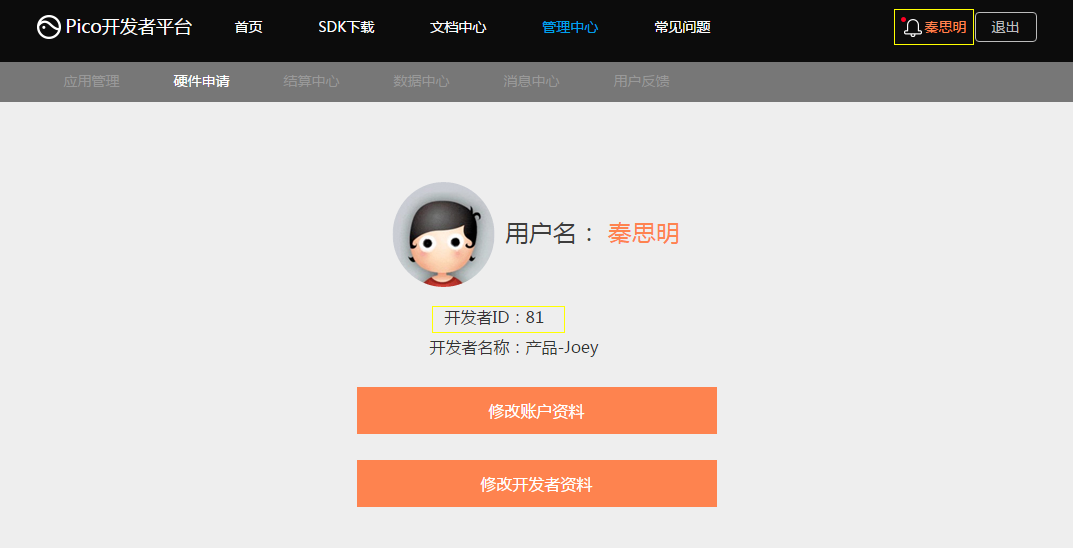
Figure 7.1 Merchant ID
- Acquire corresponding strings
Developers can enter the application creation step from the administration center. After clicking create application, first select a platform to publish:
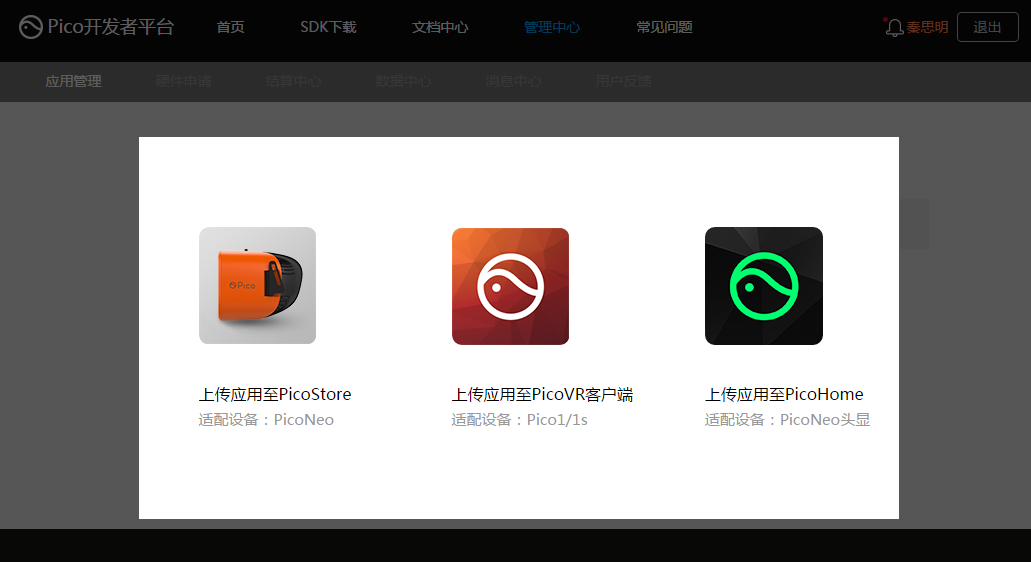
Figure 7.2 Select the Platform to Publish App
Then get into the corresponding platform to complete app related information:
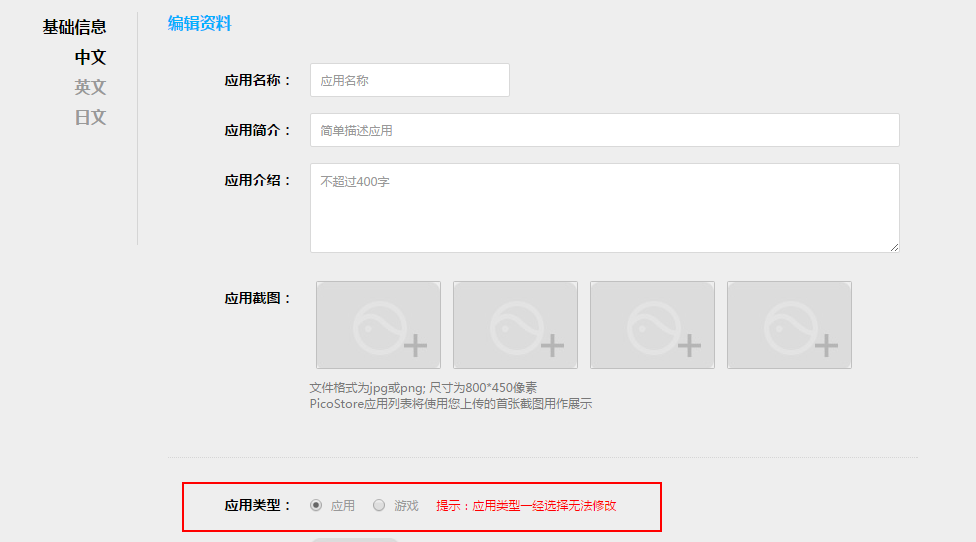
Figure 7.3 Complete App Related Info
Please pay attention to the read area in the above figure and fill in app types carefully. Once filled in, the app type cannot be modified! If there exists an inside-props payment in game applications, we require developers to use the developer backend to add a merchandise code for unified management.
After the app is created successfully, the developer platform will assign it strings, including APP ID, APP KEY, APP Secret:
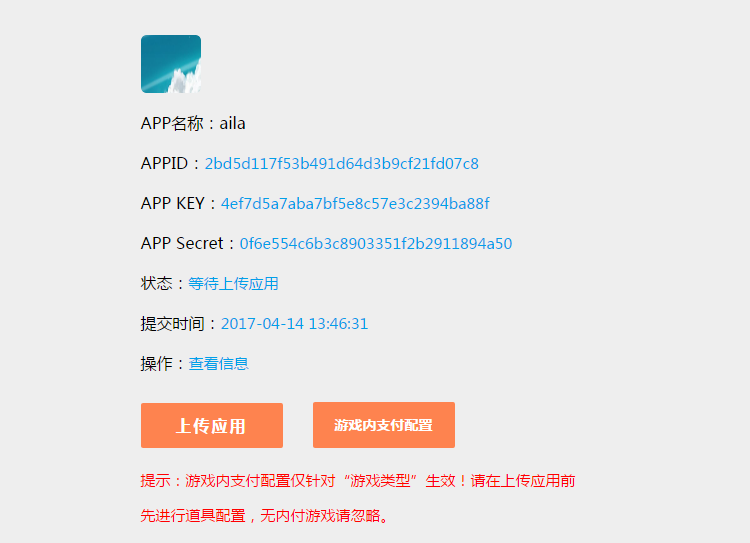
Figure 7.4 APP ID, APP KEY, and APP Secret
Then select“In-Game Payment Settings” to configure in-game purchase information:
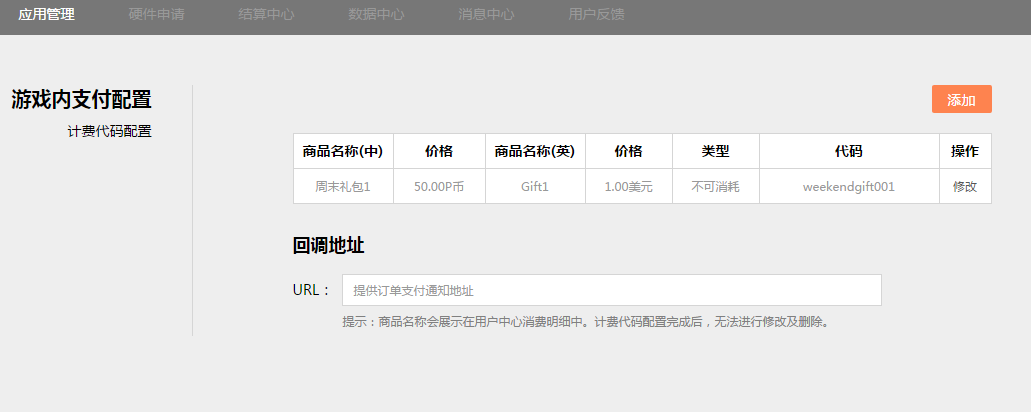
Figure 7.5 In-Game Purchase Settings
Note that the rules for merchandise codes are defined as “first character is for letters, only letters and numbers are allows and no more than 20 characters”. The merchandise codes for different props cannot be duplicated. The props are categorized as consumable props and inconsumable props. Consumable props are merchandise that can be purchased repeatedly, such as gold coins, blood bottles etc.; Inconsumable props are only one-time purchases such as weapons, unlock checkpoints.
7.1.2 Using Payment Strings
This SDK has integrated AndroidManifest file. If your project doesn’t include AndroidManifest file, use the file in this SDK directly. If your project already has it, please make sure to consolidate the relevant items in the AndroidManifest of the SDK into your existing AndroidManifest. The items to consolidate includes the following:
Required Permissions:
<uses-permission android:name="android.permission.INTERNET"/>
<uses-permission android:name="android.permission.ACCESS_WIFI_STATE"/>
<uses-permission android:name="android.permission.ACCESS_NETWORK_STATE"/>
<uses-permission android:name="android.permission.WRITE_EXTERNAL_STORAGE"/>
Activity declarations:
<activity android:name="com.pico.loginpaysdk.UnityAuthInterface">
    <intent-filter>
        <action android:name="android.intent.action.MAIN"/>
        <category android:name="android.intent.category.LAUNCHER"/>
    </intent-filter>
</activity>
<activity android:name="com.pico.loginpaysdk.component.PicoSDKBrowser"
    android:configChanges="keyboardHidden|orientation"
    android:windowSoftInputMode="adjustResize"
    android:exported="false">
</activity>
Developer information (domestic)
<!--APPID-->
<meta-data
    android:name="pico_app_id"
    android:value="APP ID"/>
<!--APPKEY-->
<meta-data
    android:name="pico_app_key"
    android:value="APPK EY"/>
<!—Authorization scope-->
<meta-data
    android:name="pico_scope"
    android:value="SCOPE"/>
<!—Developer ID-->
<meta-data
    android:name="pico_merchant_id"
    android:value="DEVELOPER ID"/>
<!—Pay Key-->
<meta-data
    android:name="pico_pay_key"
    android:value="APP SECRET"/>
Developer information (foreign)
<!--APPID-->
<meta-data
    android:name="pico_app_id_foreign"
    android:value="APP ID"/>
<!--APPKEY-->
<meta-data
    android:name="pico_app_key_foreign "
    android:value="APPK EY"/>
<!—Authorization scope-->
<meta-data
    android:name="pico_scope_foreign "
    android:value="SCOPE"/>
<!—Developer ID-->
<meta-data
    android:name="pico_merchant_id_foreign "
    android:value="DEVELOPER ID"/>
<!—Pay Key-->
<meta-data
    android:name="pico_pay_key_foreign "
    android:value="APP SECRET"/>
Note that the developer info (domestic) and developer info (foreign) in the parameters above can be filled in one group only according to the actual engineering needs. For pico_app_id/pico_app_id_foreign and pico_app_key/ pico_app_key_foreign, please fill in the string obtained officially. As for merchant_id/ pico_merchant_id_foreign and pico_pay_key/pico_pay_key_foreign, please enter the above values if you haven’t got the official values.
Note: In this configuration file, pico_pay_key/ pico_pay_key_foreign corresponds to the AppSecret of the developer platform.
7.2 Using Payment System
The payment system workflow is more complex and we have provided a demo for reference. Expand Assets> Pvr_Payment>Demo>Scenes and open the Demo scene:
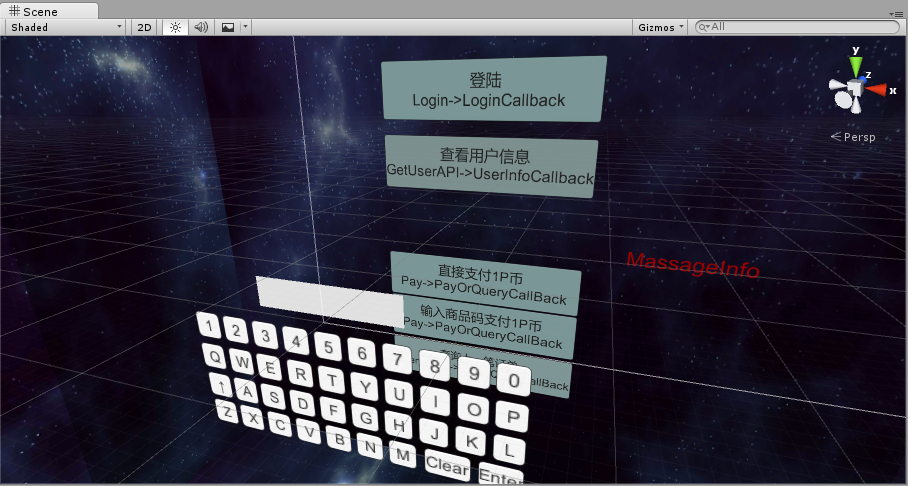
Figure 7.6 Payment Demo
As illustrated above, the left part of the button represents the method to invoke and the right part, the callback method. Please refer to the above Demo for implementation when you use the payment system
Note:
- There is a “PicoPayment” prefab in the folder Prefabs and it’s used for system callback. Please make sure that you have added this object to your project.
- Bound to the “Callback”script in PicoPayment, some callback data have been pre-processed. If you need to process other data, please modify the content of corresponding functions,
but function names cannot be changed.
7.3 Description Functional Interfaces
7.3.1 Log in
- Call method: void Login()
- Callback method: void LoginOrUserInfoCallback(string LoginOrUserInfo)
Where “LoginOrUserInfo”is the login info returned by the backend. A sample format of successful login is as follows:
{"access_token":"25ba00fb73343ff1ec32e1c152fff291",
"open_id":"2890d4a291108e73ef0e87340affe7a4",
"refresh_token":"5a189befeb3b33f7df101fbecffe4f98",
"expires_in":"1d6ef7f25a7b0ec3bbd5b6bf247adf71"}
The following is a sample format of login failure:
{"exception":"AccessToken is null"}
Or:
{"exception":"auth code of response is null}
Here is a sample format of cancelled login:
{"cancel":"cancel"}
7.3.2 Payment
- Call method:oid Pay(string payOrderJson)
Where “payOrderJson” is a Json string that contains order information, including:
| subject | The subject of the order |
| body | Order description |
| order_id | Order ID |
| total | Total merchandise price |
| goods_tag | Merchandise tag |
| notify_url | URL to notify |
| pay_code | Merchandise code |
Example 1:
Pay("{'subject':'游戏',' body ':'购买完整游戏','order_id ':'10000','total ':'10','goods_tag ':'game' }");
Example 2:
Pay("{'subject':'游戏','body ':'购买完整游戏','order_id ':'10000',','goods_tag ':'game','pay_code':'123' }");
Note: example 1 uses direct pay and example 2 uses merchandise code to pay and these two payment methods cannot be carried out at the same time. Merchandise code cannot be entered in direct pays and “total” property cannot be filled out or set to “0”when using merchandise code. In addition, these two payment methods must be consistent with the payment type configured in developer platform accounts.
- Callback method:void QueryOrPayCallback(string queryOrPayInfo)
Where “queryOrPayInfo” is pay information returned by the backend and the following is a sample format:
{"code ":"12000","msg":"Paid successfully"}
Here is the list of payment callback codes and messages:
| Code | Msg |
|---|---|
| 00000 | Network error |
| 10000 | Login success |
| 10001 | User not logged in |
| 10002 | Please enter the correct amount |
| 10003 | Login expired, please log in again |
| 11000 | Merchant validation succeeded |
| 11001 | Merchant validation failed |
| 11002 | User validation parameter error or request expired |
| 11003 | Merchant isn’t validated |
| 12000 | Payment succeeded |
| 12001 | Payment failed |
| 12003 | Insufficient P coins |
| 12004 | Balance available |
| 13000 | Generating order |
| 13001 | Failed to retrieve data |
| 13002 | Failed to create order |
| 14000 | Order is found |
| 14001 | Order does not exist/has error |
| 14002 | User has cancelled payment operation |
| 15000 | Merchandise info is missing |
| 15001 | Pre-pay ID is missing |
| 15002 | Please enter Pico pay order number or merchant odder number |
| NOAUTH | Merchant is not authorized for this interface |
| SYSTEMERROR | System error |
| APP_ID_NOT_EXIST | APP_ID does not exist |
| MCHID_NOT_EXIST MCHID | MCHID does not exist |
| APP_ID_MCHID_NOT_MATCH | app_id and mch_id does not match |
| LACK_PARAMS | Missing parameters |
| SIGNERROR | Name error |
| NO_DATA | Data not found |
7.3.3 Querying Orders
- Call method:void QueryOrder(string orderId)
Where “order” is the ID of the order to query
- Callback method:void QueryOrPayCallback(string queryOrPayInfo)
Where “queryOrPayInfo” is the order information returned by the backend and it’s an unprocessed Json string. The following is a sample format of successful query:
{
"trade_no":"22016082314719505878171324",//Pico pay order number
"open_id":"4f3148bdc34d9bca104927729a173b64",
"ret_msg":"",
"coupon_fee":0.00,
"fee_type":"PIC",
"pay_time":1471950587000,//the time payment completed
"nonce_str":"yiUzuv4VQO1OXBAzVyZSRztOmRgIOioT",
"out_trade_no":"12345678903",
"trade_status":"SUCCESS",//SUCCESS - payment succeeded
"trade_type":"EGG",
"result_code":"SUCCESS",
"mch_id":"company_id",
"ret_code":"SUCCESS",
"sub_msg":"OK",
"total_fee":100.00,//total amount of the order
"app_id":"bf18ac2de375095d63428134e44d1867",
"sub_code":"SUCCESS",
"receipt_fee":100.00,//Actual fee received
"signature":"be3fae4d68fec9c444fde821659bce69",
"buyer_pay_fee":100.00//the fee that the buyer paid
}
A sample format of query failure is as follows:
{"code ":"14001","msg":"Order does not exist"}
7.3.4 Getting User Information
- Call method: void GetUserAPI()
- Callback method: void UserInfoCallback (string userInfo)
Where “userInfo” is the user information returned by the backend and it’s an unprocessed Json string. The following is a sample of successful query:
{"ret_code":"0000",
"data":{
"aboutme":"",
"birthday":1460476800000,
"phone":"13100000000",
"username":"Admin",
"email":"",
"gender":"male",
"lastname":"",
"openid":"4f3148bdc34d9bca104927729a173b64",
"firstname":"",
"avatar":"http://172.31.83.11/upload/6dd6ee103714e967846c3d38ae48d511",
"signature":"14a25d7219d8dfc91e55f63286ae5c0a",
"country":"China",
"city":""
},
"ret_msg":"Call succeeded"
}
A sample of query failure is as follows:
{
"ret_code":"00003000",
"ret_msg":"Name validation failed"
}
List of other ret_code and ret_msg:
| 0000 | Request success |
| 00020000 | Database operation failed |
| 9999 | System error |
| 00001000 | Parameter error |
| 00002000 | Data parsing error |
| 00003000 | Name validation failed |
| 00003001 | Time validation failed |
| 00060000 | User not found |
| 00060001 | User password error |
| 00060002 | User login unknown error |
| 00061000 | User token not found error |
| 00061001 | User token validation failed |
| 00061002 | User token unknown error |
| 00070001 | App validation failed |
| 00071001 | App secret key validation failed |
| 00080001 | OAUTH_CODE validation failed |
| 00090001 | REFRESH_TOKEN validation failed |
| 00100001 | ACCESS_TOKEN validation failed |
| 00110001 | SCOPE validation failed |
7.4 Developer Server Interactions
When payment completes, the pay system will send the corresponding pay result and user information to the merchant, and the merchant needs to receive and process them and return a response.
When interacting with backend notifications, if the response that the payment system receives from the merchant is not success or timeout, it will treat it as notification failure and the payment system will periodically resend notifications with a certain strategy to improve the success rate of the notification as much as possible, but it cannot guarantee the success of the notification.
The same notification may be sent to the merchant system many times and the merchant system must be able to process repeated notifications correctly. It’s recommended that when receiving a notification for processing, first to check the status of the corresponding business data and determine if this notification has been processed, then process it if not and return success directly if it’s being processed already. Before checking and processing business data, data lock should be used for concurrency control to avoid data confusion caused by function reentry.
The merchant’s server should implement the following interfaces to receive the requests from Pico server and get payment results and user info from Pico payment system.
| Name | Callback interface for payment result |
| Request Type | POST |
| Request URL | Pay, the parameter “notify_url” that PayOrder passes |
| Request Format | JSON |
| Return Format | JSON |
| Is login required? | Yes |
| Request Parameters | See details in “Table 7.1 Params in Payment Result Notification” below |
| Example of Request Parameter | |
| Update Description |
Return Params
| Parameter | Type | Description |
|---|---|---|
| ret_code | string | Error code |
| ret_msg | string | Error message |
Return Param Example
{
"ret_code":"SUCCESS",
"ret_msg":"OK"
}
Table 7.1 Parameters in Payment Result Notification
| Field Name | Param Name | Required | Type | Description |
|---|---|---|---|---|
| Return Status Code | ret_code | Yes | String | SUCCESS/FAILThis field is a notification identification, not a trade identification. The result_code is used to determine whether a trade is successful |
| Return Message | ret_msg | No | String | Return message, if not empty, then it’s the reason of the error: Name failed – param format validation error |
| Error Code | sub_code | No | String | Error code |
| Error code description | sub_msg | No | String | The description of the error return message |
| Pico pay order number | trade_no | Yes | String | Pico payment order number |
| Merchant order number | out_trade_no | Yes | String | The internal order number in merchant system |
| App ID | app_id | Yes | String | The app APP_ID that the platform has audited |
| Merchant ID | mch_id | Yes | String | The merchant ID that the payment assigned |
| User ID | open_id | Yes | String | The unique ID of the user under the merchant’s appid |
| Device ID | device_id | No | String | The ID of the terminal device |
| Random string | nonce_str | Yes | String | Random string, less than 32 chars. Random number generation algorithm is recommended. |
| Name | signature | Yes | String | Name, see details in Name generation algorithm. |
| Business Result | result_code | Yes | String | SUCCESS/FAIL |
| Trade Type | trade_type | Yes | String | Payment type |
| Currency Type | fee_type | Yes | String | Currency type |
| Total Fee | total_fee | Yes | String | Total order amount |
| Actual Fee | receipt_fee | Yes | String | Actual Fee |
| The amount of the fee the buyer paid | buyer_pay_fee | No | String | The amount of the fee the buyer paid |
| Voucher or Discount Amount | coupon_fee | No | String | Vouchers or Discount Amount |
| Merchant Packet | attach | No | String | Merchant packets, returning as-is |
| Pay completion time | pay_time | Yes | String | The time that payment completes, the format is “yyyy-MM-dd HH:mm:ss” |
Table 7.2 Return Results
| Field Name | Param | Required | Type | Description |
|---|---|---|---|---|
| Return status code | ret_code | Yes | String | SUCCESS/FAIL SUCCESS represents that the merchant has successfully received notification and validated. |
| Return message | ret_msg | No | String | Return message, if not empty, then it’s the reason of error: Name failed - parameter format validation error |
Special Reminder: the merchant system must perform Name validation for payment result notification contents, in order to avoid loss of fund caused by “fake notification” due to data leakage.
Name validation rules:
- In the list of returned parameters, remove Name parameter and add “key = “app_secret”, value=paykey”, then perform natural sort according to the value of “key”, use “&”to separate multiple parameters and conduct MD5 encryption.
- Compare the encrypted string with the Name you obtained
The Name function is as follows:
/**
* result: the map collection of retrieved data
* paykey: It’s the paykey on the developer platform
*/
public static String createSign(Map<String, Object> result, String paykey)
{
if (result == null || result.size() == 0)
    return null;
result.put("app_secret", paykey); //1.Add key = “app_secret”, value=payke
String sign = result.get("Name");//2.Save Name value, to be used for validation
result.remove("Name"); //3.remove Name parameter
String[] tmp = new String[result.size()];
int i = 0;
for (String key : result.keySet())
{
    tmp[i++] = key;
}
Arrays.sort(tmp); //4.natural sort
String sign = "";
for (String string : tmp)
{
    if (m.get(string) == null)
        continue;
    sign += string + "=" + URLEncoder.encode(m.get(string).toString()
        , "utf-8") + "&";
}
if (sign.endsWith("&"))
    sign = sign.substring(0, sign.length() - 1);
Log.i(TAG, "createSign: " + sign);
String localSign = MD5.MD5(sign); //5.generate MD5 encrypted string
return localSign.equal(sign);//6.validate with “sign” in 2
}